Happy New Year! I hope 2013 is filled with wonderful things for you all, and now that 2012 and the holidays are over, I can share those fun DIYs I teased you with in my previous blog! I'm a crafty person by nature, and with the help of Pinterest, this holiday season's gifts didn't stand a chance; there was bound to be glitter, yarn, boas, and creativity galore! Since I did quite a few, I'll break them down into separate blogs - I think these crafts are are great gift ideas for friends and family, and even for yourself, if you find yourself in need of a little TLC, as well as great inspiration pieces to get your mind going on a party, and are definitely adaptable for a Ballerina Birthday (I know I'll be using some of these for upcoming 2013 parties)!
Today I'll do the Hobby Horse tutorial, these hobby horses I made as Christmas gifts for my niece and nephew and I think were my favorites of all the crafts I did. Here's the inspiration pin I found on Pinterest; I didn't follow all the directions from this pin (namely I used fabric glue instead of sewing, it worked just as well and so far the ponies have been played with and haven't fallen apart)! Aren't they cute?!
 |
| Here they are! Pony Palls |
 |
Find a fuzzy sock and stuff it with something fluffy-
I used poly filled batting, but you can use pillow guts too.
Cut out nostrils from a sheet of Foamie material (from Michael's or the like),
and place a pair of googlie eyes about 5 inches above the nostrils.
I got my eyes and the fake eyelashes from the Dollar Store and
used fabric glue for all this! |
 |
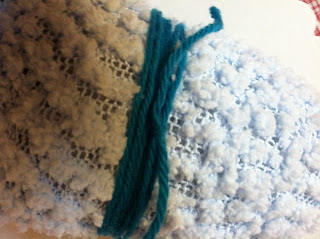
Grab some yarn to make a bridle above the nostrils.
Just start wrapping it neatly around the sock, I wound
mine about 6-8 times. |
 |
Cut the ends on the backside of the face, leaving a little
extra room to tie a knot. |
 |
| Tuck the ends in, and voila! |
 |
Next, attach the head to the pole. For this horse I used the base
of a mop, since this one was for my nephew, who's not quite two
and I figured it'd be easier for him to hold and pick up, but
for the girly-er horse I used a thicker dowel. Use that fabric glue
on the inside of the sock and slide the top of the dowel up the sock
and hold it all together with your hand for a minute or two.
Then, for extra stability, use your yarn and start wrapping
it around the neck. |
 |
Do this several times up and down the neck and cut the ends
to tuck them in like you did for the bridle. It's ok if this
doesn't look perfect, the mane will cover it later, or you can
tie a bow here to cover it up.
|
 |
Here's what it looks like on the base of the mop.
|
 |
Cut out some ears from that same Foamie sheet and glue them
to the top of the head. |
 |
Attach the ears where you like them and then cover
the back of the head with fabric glue to attach the
boa. For this purple boa, I folded it over to make 4 shorter strands
Here's what it looks like on my girly pony. |
 |
For the reins on the girly horse I used heart beads and for the
more many horse I used gold Christmas garland. Attach the
ends on either side of the bridle. Here I did take a few
small stitches into the sock to attach the reins to the bridle.
 |
Here's the bridle from the side, and you can see how
the boa fluffs out nicely, and just for fun I added
a clip on butterfly! |
|
Seeing the faces of my niece and nephew on Christmas was priceless, and watching them cowboy and cowgirl around the house the rest of the afternoon was wonderful. I also attached a little story to these guys, telling their new owners that their new pals needed a name and lots of TLC to ensure epic adventures. I can't wait to make some more of these, I think they'll be a great addition to Ballerina Birthday props!


No comments:
Post a Comment