Welcome!

The Ballerina Birthday is an event service based in the San Francisco Bay Area specializing in children's parties for young movers who love to dance, prance, and whirl! We believe that celebrating is best done in a tutu and that shared giggles are the best presents!

Wednesday, April 10, 2013

New Ballerina Reads!

It has been far too long since my last post, so sorry!  We're still in the process of updating our website (it's turned into one of those projects that takes much longer than originally anticipated)! In the meantime, thank you for being patient and checking out the blog! I hope to bring you the new site soon!

So spring has definitely sprung, and for California, there's even a touch of summer in the air!  I don't know about you, but summer makes me want to stock up on good books to read (along with fun dresses, sunglasses, and flip flops), and my quest for summer reading has already begun.  I've mentioned before that one of my favorite places in a bookstore is the children's section, so it's no surprise that for my summer reading I'm adding a few Ballerina Birthday friendly books to the pile.  Here are a few of my favorite finds!

Part-time Princess by Deborah Underwood and Illustrated by
Cambria Evans.  A fun story of an ordinary girl by day who braves trollsand dragons by
night, while attending balls and teas!
Ella Bella Ballerina and Cinderella by James Mayhew.
Beautifully illustrated and charming stories of Ella Bella
and her adventures with characters from well known ballets.
Miss Lina's Ballerinas and the Prince by Grace Maccarone and
Illustrated by Christine Davenier.  Another beautifully illustrated
book that follows the adventures of Miss Lina's ballerinas
in fun rhyming fashion.
All these are available on Amazon, or at your local bookseller.  Be sure to check out my past blog posts on great ballet reads here.  Happy reading!

Tuesday, February 26, 2013

Thank You!

There's nothing like a nice thank you note, don't you agree?  I know they're a bit of a rarity these days, but I still enjoy writing them, and I definitely enjoy receiving them!  How cute is this thank you card from Olive and Zoe, my two 12 Dancing Princesses ballerina birthday girls from last month?  


It's super sweet, right? I wanted to share it here and also express my thanks to you readers for my lack of consistent blogging lately.  We're in the process of giving our website and blog a little makeover, so please bear with me as we make that transition.  I hope to have our new site up and running soon!  Check back every so often, I think you'll love our new look!  Thanks!

Wednesday, February 13, 2013

12 Dancing Princesses Slipper Craft

The 12 Dancing Princesses Party I did a few weeks ago was a blast!  Everything came together in a way that made the afternoon really magical, sweet, and tons of fun.  One source of inspiration was Su Blackwell's The Fairy Tale Princess book, with beautiful artwork and illustrations, and the tale of 12 Dancing Princesses.  For the craft portion of the party, it was decided that each of the guests would get their own 11x17 canvas to decorate a pair of slippers however they saw fit! (I've seen ideas for painting parties on Pinterest, looks like so much fun)!
Are you ready for this craftyness?!  Here's how it went down...

I traced out a pair of slippers first in pencil on each
of the canvases, then later (once I was done erasing
my mistakes and boo boos) outlined the slippers with
a thin Sharpie.

Then I colored the slippers in with my chosen colors and
glued ribbons and added a border and few other decorations.
This canvas served as the example for the guests...


The kids creations came out all so different and wonderful!
With the addition of sparkly jewels, foamie hearts and glittery
flowers, they were beautiful works of art!
I was so thrilled with how this craft turned out.  The kids had a blast and were happy to take home their own piece of artwork; it was a special keepsake to remember a wonderful day!

Wednesday, February 6, 2013

Learning from the Arts

Growing up dance, art, and music was a part of my daily life; it was something I loved, and I was lucky enough to have parents who not only shared my interests, but promoted them.  Now, as a teacher, I love to spout the benefits of art in education.  It's very clear to me how valuable the arts are to not only supplement education, but to jumpstart and encourage the academic endeavors students undertake at any age, whether they're 3 or 18. 
It's always nice to read more on this subject, since it's one that's near and dear to my heart, and last week The Washington Post published this article on Top 10 Skills Children Learn From The Arts, and I wanted to share it here since I thought it makes some great points and reminders that in an ever increasing 'right brain world' that loves technology, the arts, and the skills they provide, can sometimes be lost.  Kids should be able to have as many opportunities as they can get to become successful individuals, and having art in their lives is one sure fire way to encourage their creativity, adaptability, and confidence.
Think dance education should be a regular part of kids lives? There's a new petition, which can be found here, that all US children have access to dance education, at all levels of schooling.  I'll be signing! How about you?!


Thursday, January 31, 2013

A 12 Dancing Princesses Birthday Party!

I was so excited to get to do a party for two of my students from Sonoma Conservatory of Dance - Olive and Zoe are precocious sisters with a penchant for dance, and when their mom Julie told me they were itching for a Ballerina Birthday I was instantly excited!  There were so many great elements to this party, from the theme to the craft to the decorations, that I'll be blogging about it for awhile, be sure to check back!
The girls celebrate their birthdays together, since their birthday are separated by just a few weeks, which I thought was a sweet tradition, not to mention twice the fun!  The girls chose 12 Dancing Princesses as their theme, and Julie had a lovely book by Su Blackwell with fantastic illustrations to set the mood and tone for our dance lesson (I loved this book and will definitely be blogging about it more soon)!

A happy birthday guest!

Tutus and a pretty table!
Olive, Zoe, and their guests were absolute princesses.  We skipped and twirled through the enchanted forest where the princesses disappeared to at night, pretended to slip on our own fancy slippers to walk, tendu and march in, and used wands, scarves and ribbons to bring life to the trees, butterflies, and castle we read about.
After our own dancing adventures, students from Sonoma Ballet Conservatory performed excerpts from Les Sylphides and Raymonda for us.  The dancers were lovely, and received many rounds of appreciative applause before getting into craft time.  Each guest got their very own canvas to decorate a pair of ballet slippers for this super fun craft.  Here are some of the results...

Crafty action!
A SCD dancer performs

Look at that face!

Big birthday smiles : )
I have to say, The 12 Dancing Princesses may be a new favorite theme of mine for Ballerina Birthdays.  Julie had a wonderful vision to decorate the space, and with the excitement of the birthday girls, their guests, beautiful costumes, fun dance lessons and the lovely dancing by Sonoma Conservatory of Dance, it really was a birthday to remember!

Thursday, January 24, 2013

Ballet for the Big Kids

I can't believe that January is almost over! I've been trying to check things off my to-do list, and be consistent about putting into place the goals I've set for myself for the new year.  (Some of you might remember the New Year's Goal Frame I did for 2012.  I haven't done one for 2013 but I do have a new set of goals)!
Maybe one of your goals (like mine), is to stay active and healthy; maybe try out some new fitness and exercise regimes and classes.  I've blogged before about what great exercise ballet is at any age, I have many of my adult ballet students tell me that class not only keeps them feeling limber and lithe, but that they're consistently introduced to working new muscles (often ones they didn't realize they had), and that the challenge of a ballet class is something that literally keeps them on their toes.
I found these great blogs about being an adult ballerina, and wanted to share.  
Grown-Ups at the Barre is an excellent resource for those interested, already dabbling, or full-fledged adult balletomanes.  Check out their blog - 100 Reasons to Study Ballet.
Blogger Johanna takes us on her journey as an adult ballerina in her blog Pointe Till You Drop.  She doesn't dance professionally, but has passion and a great appreciation for all things ballet.  I love her entry, Home is Where the Barre Is.

Adult Ballet at St. Paul City Ballet
If you're debating whether to try ballet as an adult, I encourage you to try it!  Trust me, you don't have to wear a tutu, and even if you're an extreme beginner, most teachers are happy to work with you and offer options for exercises that are suited to your needs.  These blogs offer some great insights, and I'm hoping they can help inspire you to take that first class, whatever type of dance it may be!  Have any insights of your own? I'd love to hear them!

Tuesday, January 15, 2013

Oh Crafty Day! #3 - Votive Tutorial

Yet another crafty creation I did this holiday season for family and friends were these great votives.  Yep, you guessed it, the inspiration came from this Pin, but I did make some adjustments of my own along the way.
These are great just by themselves (who doesn't like to receive the gift of great lighting for a present?), or when paired with some bubble bath, body scrub, a good book, or tea to set the mood for some R&R.  I'm even thinking of making a batch to have on hand to use at my next Ballerina Birthday at the end of the month.  These would look so sweet on a birthday table, along with some festive flowers for table decorations.
This project really couldn't be easier, but does require some patience while waiting for the glue to dry (if you choose to use glue), and anticipate getting glittery.  IT GETS EVERYWHERE!  (But hey, it was Christmas, and if you're going to go overboard on glitter, it might as well be at the holidays, right)?

For these three votives I found used different shapes/sizes to see what I liked.
My favorite ended up being the long cylinder (on the right).  These were
all from the Dollar Store.


Just place double sided tape where you like, cover with glitter, and voila!
I do advise lots of newspaper/scratch paper to catch the glitter!


Instead of buying tea lights separate from the votives, I picked up a pack of 12
votives with candles already ready to go for the next round of decorating.
I also decided in this round to use a glue pen to try different designs
on the votives.  Here are diagonal stripes, but I also did chevrons
and polka dots, so the possibilities are endless!

After you've made your design, just cover in glitter!  Obviously, this
will be a bit messy, but if you let it dry completely (overnight ideally),
and brush the extra glitter off with a toothbrush you should be left with
your glittery design!
You can always go freehand as well! I did just simple designs
by freehand since I didn't trust myself to do anything really fancy, but
if the spirit moves you, go for it! The glue also wipes off pretty easy, so
if you make a mistake you can always start over!


Tuesday, January 8, 2013

Oh Crafty Day! #2 - Mug Tutorial

And the crafting continues!  The hobby horses were great gifts for the kiddos on my list, but for the adults on my list I wanted to provide a gift that was a bit more versatile, yet still unique and fun!  Again, my inspiration came from this Pin via Pinterest, and really this craft couldn't be simpler.  It's as easy as picking up some mugs from the Dollar Store, a few Sharpies, and finding a design, quote, or doodle that's to your liking.  Pop them in the oven and you have a personalized gift!

I found all my mugs at the Dollar Store and used several different
kinds of Sharpies - I figured a ceramic friendly kind would be best
and washed the mug thoroughly before starting.

Sometimes C is for...

Coffee! (I love Cookie Monster, but sometimes this is just
more appropriate)! After you're done drawing the design,
just pop in the oven at 350 for 30 min

I made these couple cups for my brother and sister-in-law.

When paired with some coffee and tea mixes and a movie they had
a cozy date night in kit!

I loved how the gold turned out on the black mug...

Remember to keep the design down far enough on the mug for
its owners lips not to touch where the Sharpie has been, unless
you know the marker you've used is non-toxic.

And, I wanted to add my own little touch on the handle :)
See, how easy was that?! Just in case you were wondering, these are best hand washed, not in the dishwasher (I speak from experience). Whether these are a gift for yourself, or for others, maybe party favors even, they are a great and easy way to customize and specialize the gift giving process!

Wednesday, January 2, 2013

Oh Crafty Day! #1 - Hobby Horse Tutorial

Happy New Year! I hope 2013 is filled with wonderful things for you all, and now that 2012 and the holidays are over, I can share those fun DIYs I teased you with in my previous blog!  I'm a crafty person by nature, and with the help of Pinterest, this holiday season's gifts didn't stand a chance; there was bound to be glitter, yarn, boas, and creativity galore!  Since I did quite a few, I'll break them down into separate blogs - I think these crafts are are great gift ideas for friends and family, and even for yourself, if you find yourself in need of a little TLC, as well as great inspiration pieces to get your mind going on a party, and are definitely adaptable for a Ballerina Birthday (I know I'll be using some of these for upcoming 2013 parties)!

Today I'll do the Hobby Horse tutorial, these hobby horses I made as Christmas gifts for my niece and nephew and I think were my favorites of all the crafts I did.  Here's the inspiration pin I found on Pinterest; I didn't follow all the directions from this pin (namely I used fabric glue instead of sewing, it worked just as well and so far the ponies have been played with and haven't fallen apart)!  Aren't they cute?!

Here they are! Pony Palls
Find a fuzzy sock and stuff it with something fluffy-
I used poly filled batting, but you can use pillow guts too.
Cut out nostrils from a sheet of Foamie material (from Michael's or the like),
and place a pair of googlie eyes about 5 inches above the nostrils.
I got my eyes and the fake eyelashes from the Dollar Store and
used fabric glue for all this!

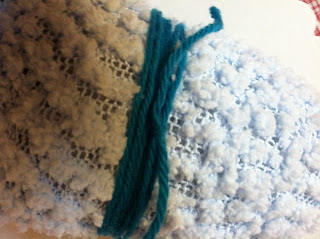
Grab some yarn to make a bridle above the nostrils.
Just start wrapping it neatly around the sock, I wound
mine about 6-8 times.
Cut the ends on the backside of the face, leaving a little
extra room to tie a knot.


Tuck the ends in, and voila!


Next, attach the head to the pole.  For this horse I used the base
of a mop, since this one was for my nephew, who's not quite two
and I figured it'd be easier for him to hold and pick up, but
for the girly-er horse I used a thicker dowel.  Use that fabric glue
on the inside of the sock and slide the top of the dowel up the sock
and hold it all together with your hand for a minute or two.
Then, for extra stability, use your yarn and start wrapping
it around the neck.
Do this several times up and down the neck and cut the ends
to tuck them in like you did for the bridle.  It's ok if this
doesn't look perfect, the mane will cover it later, or you can
tie a bow here to cover it up.
Here's what it looks like on the base of the mop.

Cut out some ears from that same Foamie sheet and glue them
to the top of the head.
Attach the ears where you like them and then cover
the back of the head with fabric glue to attach the
boa.  For this purple boa, I folded it over to make 4 shorter strands
Here's what it looks like on my girly pony.
For the reins on the girly horse I used heart beads and for the
more many horse I used gold Christmas garland.  Attach the
ends on either side of the bridle.  Here I did take a few
small stitches into the sock to attach the reins to the bridle.

Here's the bridle from the side, and you can see how
the boa fluffs out nicely, and just for fun I added
a clip on butterfly!

Seeing the faces of my niece and nephew on Christmas was priceless, and watching them cowboy and cowgirl around the house the rest of the afternoon was wonderful.  I also attached a little story to these guys, telling their new owners that their new pals needed a name and lots of TLC to ensure epic adventures.  I can't wait to make some more of these, I think they'll be a great addition to Ballerina Birthday props!